This shouldn't even count as a full post but...I found them! I found my Maybelline EyeStudio gel eyeliners in Forest and Sapphire. I am out $24 but my search is over. I hunted at one more Duane Reade but I finally found it at CVS. Sadly, I don't get to use any kind of discount because it's a nonsale item but I did get $3 extrabucks for spending $10. Which just means I'm going to spend more later because there's a deadline to using that $3. Argh.
In other news, my mom threw away the receipt for my Revlon eyelash curler which I've decided is way too big for my eye and that I was going to return tomorrow. So I'm out $5.
This is all to say that I will be testing out these eyeliners ASAP and reviews and swatches will follow.
If you live in NY, the CVS that happened to have the entire Maybelline Fashion Week display was at...
307 Avenue of the Americas
(between Carmine St & Minetta Ln)
New York, NY 10014
Wednesday, September 7, 2011


Tuesday, September 6, 2011
Sigma Brush REVIEW
First, I will take you through the process of opening the package I got from Sigma. Very professional and lovely with lots of brochures. Sorry I don't make videos but as you can see my camera quality is not great.


Brushes with a "Congratulations"/Cleaning Intstructions card in a red-gauze drawstring bag.

Front of card

Back of card

Brochure #1

Inside Brochure #1

Brochure #2

Inside Brochure #2

Brochure #3

Inside Brochure #3

Close up of the brushes I ordered
Left to right (from the top down): Eye Shading E55 Brush, Small Contour F05 Brush, Pencil E30 Brush
So...onto the actual review. I've been using these brushes for about a month now so that's what I'm basing my review on. I don't know how they hold up over months or years.
Small Contour: F05
I use this brush for blush and sometimes for applying setting powder because I contour with liquid foundation. This brush does the job but not exceptionally well. It is pretty soft. It applies my Stila blush too heavily and my Covergirl blush too lightly. It doesn't blend blush pigment very well. It sheds to a ridiculous degree. I think soon there might not even be bristles left. My main problems are the varied applications, the lack of blending, and the amount of shedding. It is a month into using this brush and washing it after every use and it sheds at least 50% of the time (more than a few bristles).
Eye Shading: E55
This brush gets on my nerves. It is a good size for my eyes. I can use it to apply a highlight color, a base color over the eyelid, and maybe even the outer half of my eye if I'm not being too precise. BUT it doesn't lay down color very well, it doesn't blend well, and it is super abrasive to the point of being painful. If I lay the brush completely flat against my skin so none of the tips of the bristles are in contact with my skin it is a mediocre brush. Should even one bristle jab my skin at the right angle...ouch! This thing is incredibly painful.
Pencil: E30
This brush is a great size for a highlight at the inner corners of the eyes and doing the crease. I wish the taper were better. It's less of a tapered brush and more a bunch of uneven bristles. Like the eye shading brush it pokes me a lot. It is less painful though, and is usually not painful when I'm applying color to the crease, just when I'm applying a highlight at the inner corners or lining the bottom of my eye with eyeshadow.
So, yes. I am on the lookout for new brushes. They might be elf. I might even spring for MAC. I just want soft brushes that do what they're supposed to do. If anyone has any suggestions, please leave them in the comments. :)
A Sad Day in the Rain For A Beauty Addict
I hate the rain. And the wind. They make me grumpy and very irritable. Add to that trekking off to nowhere to find one of my classes and carrying home a huge collection of books after a ridiculous wait in line at the bookstore and I had started muttering like a crazy person.
I am thus sad to report that of 1 Walgreens, 1 Duane Reade, and 1 CVS (I will check out KMart, 2 Duane Reades, and a Rite Aid another day) I was unable to find the Maybelline gel eyeliner I have been coveting. They've come out with a dark green shade (Forest) and a dark blue shade (Sapphire) and I may get one or two depending which drugstore deal works out best. So yes, Walgreens, CVS, and Rite (NOT Duane Reade which apparently never has sales) all have discounts on Maybelline this week and yet it's rainy and miserable (at least until Thursday) and I can't find the thing I want to be on sale. This is usually how my hunt for beauty products go. In other news, none of the 3 stores had the new Essie Fall 2011 collection either, but I happily snagged those as soon as I saw them from one of the Duane Reades that I did not go check today.
Ah, well. Hopefully the weather will clear up for Fashion's Night Out. If I get myself out of bed (physically and emotionally drained right now) I will report back with stories and pictures. :)
I am thus sad to report that of 1 Walgreens, 1 Duane Reade, and 1 CVS (I will check out KMart, 2 Duane Reades, and a Rite Aid another day) I was unable to find the Maybelline gel eyeliner I have been coveting. They've come out with a dark green shade (Forest) and a dark blue shade (Sapphire) and I may get one or two depending which drugstore deal works out best. So yes, Walgreens, CVS, and Rite (NOT Duane Reade which apparently never has sales) all have discounts on Maybelline this week and yet it's rainy and miserable (at least until Thursday) and I can't find the thing I want to be on sale. This is usually how my hunt for beauty products go. In other news, none of the 3 stores had the new Essie Fall 2011 collection either, but I happily snagged those as soon as I saw them from one of the Duane Reades that I did not go check today.
Ah, well. Hopefully the weather will clear up for Fashion's Night Out. If I get myself out of bed (physically and emotionally drained right now) I will report back with stories and pictures. :)
Monday, September 5, 2011
How I Do My Nails
This is a really simple post. I'm just going to go into my method for doing my nails. I've been doing them since maybe middle school and I used to go for maybe a month to a couple of months without repainting at all without chipping or damage (unless I did something like catch my nail while closing a drawer). The only problem is my nails grow really quickly (I know, what a problem to have, right?) so if I want to keep them looking salon fresh I really have to redo my manicure every week (or 2 weeks if I'm lucky).
DISCLAIMER: I am not an expert. This is just what works for me.
Step 1: Wash your hands.
Clean hands are essential because a) you don't want to be painting with dirty hands or even with too much of the oil and grime you pick up naturally because you don't want your fingers slipping when they're holding the brush or transferring dirt onto your nails b) you're essentially sealing anything on the surface of your nail with a few coats of lacquer so you don't want to be trapping dirt and bacteria in there until you remove your nail polish (ugh)

Step 2: Clean and file your nails.
This step can involve whatever you're comfortable with. Filing tools, emery boards, hand cream, cuticle oil, etc. etc. If you have old polish on your nails, clean it on with non-acetone polish remover. Then, personally, I just take my Revlon filing tool (wait for some kind of coupon/sale and they're pretty cheap considering how long they last) and use the shaping side to reduce the length of my nail and maybe to file off the corners and the finishing side to do most of the work in perfecting the shape of the nail. You can file your nails square, oval, circular and short. Whatever works for you. I like either a long oval or a short oval because my fingers are long and thin and I think it looks more elegant. I don't like to touch my cuticles. They don't bother me. If you are having issues I would go to a salon you trust and have your nails done once every few months or as often as necessary to deal with the problem but I think cuticles are like undesirable body hair and the more you fuss with it, the worse it gets. After filing, I will wash my hands again to make sure I rinse away all the nail residue from filing my nails. Then, this is important, I let my nails dry. You want your nails to be dry before you start painting them because they can retain water and then change their shape as they dry. Then, I just take a Q-tip and dip it in some Non-Acetone Nail Polish Remover (I use Harmon brand but nail polish remover with alcohol or that dries quickly is fine) and rub the Q-tip over my nails to prep them for the polish.


Step 3: Use a base coat.
Now, it may seem like it's way too much money to spend on base coat, nail polish, AND top coat, but it's worth it. To cut costs, I use Sinful Colors as a base coat (I think it's around $1-$2 at most drugstores). It goes on pretty smooth if I've done a good job of cleaning up my nails. Sometimes I roll it between my palms to mix it. I try and avoid shaking any polishes because it usually creates bubbles when I try to apply the color. Base coat will protect your nails from the nail polish (especially dark colors) and provides a nice smooth base for you to work on. I know there are other base coats that claim to fill the ridges you might have in your nails from sanding, filing, or acrylics but I don't have ridges so I've never tried any of them. If you want to splurge on a slightly more expensive base coat, I've heard lots of good things about Orly Bonder.

Step 4: Apply nail polish
Now, a lot of this depends on the formula. As you can see from my reviews, sometimes there's nothing you can do to make something work.
- Creamy/regular formulas are the easiest to apply especially if they have some shine or shimmer.
- Frosty colors can apply streaky
- Glitter polishes are a pain to remove especially if they contain large flakes of glitter and not granules
- Try and choose something that goes with your skin tone so you don't obsess over how much you don't like it every time you look down at your hands (which is a lot more often that you think)
- In-store tips: If you can open the bottle of nail polish, do so and watch how quickly the polish runs down the brush. If there isn't a lot of polish on the brush and the polish runs down very quickly, chances are you have a watery polish. If you're in love with the color, try other bottles (maybe that's just a bad one) or look for dupes. Do not try polish on your nails in the store. That is tacky and inconsiderate if you don't end up buying the polish.
- Match your polish to your life. Try and choose something work appropriate that will go with what you have in your closet which will make you smile when you look at it. If this seems like too intense of a plan, nude colors, reds, pinks, and dark colors pretty much go with everything.
- Pay attention to the tone of the color. Is it bright or dull? Is it cool or warm? Essentially, even if you look good wearing that color will the tone of that color wash you out or bring out yellow, red, or dull tinges in your skin? Alternately, will a color bring out brightness and warmth? Don't just look for a color, look for a certain kind of color.
- If you can see that you have a watery formula or that a lot of polish was at the top of the brush and it's running down the brush, do not apply the brush to your nails. Wipe off the brush on the edge of the bottle (as much as possible) and then just get a dab of polish on the tip of your brush.
- If you're a beginner, are having problems keeping your fingers apart, or are trying to paint your non-dominant hand (your left hand if you're right-handed, your right hand if you're left-handed) then you may want to wait until the coat of nail polish you painted is completely dry before moving on to the next finger. This way you won't run the risk of smudging the nail you just painted.
When you're on your 2nd or 3rd coat, wipe most of the polish off of the brush. Then, run the edge of the brush along the edge of your nail (the tip) and seal off the polish. This helps the polish stay on longer.
Step 5: Apply a top coat
A top coat is very important. Like a base coat, it leaves a smooth, often shiny, finish to the nail and protects the nail from damage. I am a big fan of Seche Vite. I know the formula isn't a 100% healthy but I've said this before...my beauty products are likely not going to be the thing that kills me.

And that's it! 5 easy steps to long-lasting nail polish. Of course, you should try to buy quality products and to try and avoid slamming your nails in drawers. :)
Sunday, September 4, 2011
Navy Tipped French Manicure
I've been wanting to try out some nail art for a while and ever since I saw this look on Polish or Perish, one of my favorite nail polish blogs, I knew I had to go for it. http://polishorperish.blogspot.com/2011/08/new-shape-new-french.html
This is just my old polish from my review of O.P.I.'s Mimosas for Mr. and Mrs. with Midnight Cami on the tips. Full disclosure, I had to redo the nude shade on one finger on each hand after messing up with the navy. I would suggest going very slowly and doing successively thicker stripes. Try and lay down a tiny stripe right at the edge of the nail and then work out from that, slowly figuring out the shape. Also, toothpicks and Nail Tees were very useful for this look.
In case you want to check out the original video, here's the link. I watched this a few days before I tried the look. http://www.youtube.com/user/lisaeldridgedotcom#p/u/2/7jLTuizFjl8


This is just my old polish from my review of O.P.I.'s Mimosas for Mr. and Mrs. with Midnight Cami on the tips. Full disclosure, I had to redo the nude shade on one finger on each hand after messing up with the navy. I would suggest going very slowly and doing successively thicker stripes. Try and lay down a tiny stripe right at the edge of the nail and then work out from that, slowly figuring out the shape. Also, toothpicks and Nail Tees were very useful for this look.
In case you want to check out the original video, here's the link. I watched this a few days before I tried the look. http://www.youtube.com/user/lisaeldridgedotcom#p/u/2/7jLTuizFjl8


Tuesday, August 30, 2011
O.P.I. Mimosas For Mr. and Mrs. REVIEW and swatches
Yay! My camera is working again! To celebrate and because I am a crazy person who cannot help stopping by the nearest drugstores (I know where they all are now...it is becoming a problem) I have decided to celebrate with a new review. After the horrendous experience of picking glitter off my nails when the cotton ball/aluminum foil trick wasn't enough to remove Deborah Lippmann's "Across the Universe" (next time I will try using Essie midnight cami as a base and then just doing a coat or two of glitter) I decided to put off trying some of my darker fall shades and instead go for a nice nude.
Now, I don't like pink. At all. And I don't like nude/beige/muted shades in general as they tend to wash me out. My skin isn't really cool or warm but takes its cue from my makeup/nail polish/clothing shades.
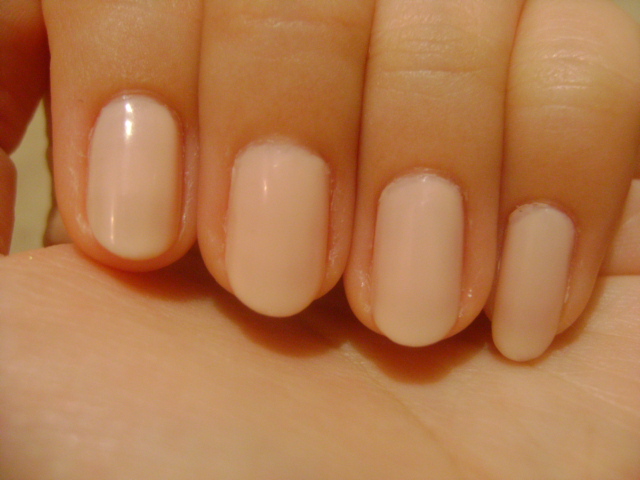
Because I don't have much experience with nudes I don't know how much help I'll be but here are my thoughts regardless... I really like this polish. My opinion changes depending on the lighting but in sunlight and white fluorescent light it looks very refined and sophisticated. It's a pale peach but it has a certain degree of warmth to it and it brings out the dusky, cool tones in my skin. It makes my hands look darker/more tan in dim or yellow lighting so you kind of get two different looks from this polish.

 Time for swatches!
 How gorgeous is this? And while this looks very spring-appropriate and girly, nudes work all year round because they are so close to your skintone. It's like doing natural eye makeup.


 Eh...not loving as much.
Application. I do not have a lot of luck picking O.P.I. shades except for I'm Not Really a Waitress. Otherwise, all the others have been sheer and watery. This one was similar but definitely much better. At 3 coats, everything was pretty even and slightly sheer. I had to do some cleanup in the corners but it didn't just bleed into my cuticles. I recommend doing light coats and just building color as frustrating as that might be. I ended up doing 4 coats because I wanted to see if I could get it opaque and because the 3 coats on my thumb weren't even (my fault). I wouldn't run out to get this but it's a nice nude light pink nevertheless. If many of your drugstores are like mine and mostly carry pinks and reds and you like my swatches, go ahead and pick this up. :)




Now, I don't like pink. At all. And I don't like nude/beige/muted shades in general as they tend to wash me out. My skin isn't really cool or warm but takes its cue from my makeup/nail polish/clothing shades.
Because I don't have much experience with nudes I don't know how much help I'll be but here are my thoughts regardless... I really like this polish. My opinion changes depending on the lighting but in sunlight and white fluorescent light it looks very refined and sophisticated. It's a pale peach but it has a certain degree of warmth to it and it brings out the dusky, cool tones in my skin. It makes my hands look darker/more tan in dim or yellow lighting so you kind of get two different looks from this polish.
Cat is a participant in the Amazon Services LLC Associates Program, an affiliate advertising program designed to provide a means for sites to earn advertising fees by advertising and linking to amazon.com.
If you would like to help support this site, please consider making your next purchase through amazon.com through the links on my page.
If you would like to help support this site, please consider making your next purchase through amazon.com through the links on my page.


Application. I do not have a lot of luck picking O.P.I. shades except for I'm Not Really a Waitress. Otherwise, all the others have been sheer and watery. This one was similar but definitely much better. At 3 coats, everything was pretty even and slightly sheer. I had to do some cleanup in the corners but it didn't just bleed into my cuticles. I recommend doing light coats and just building color as frustrating as that might be. I ended up doing 4 coats because I wanted to see if I could get it opaque and because the 3 coats on my thumb weren't even (my fault). I wouldn't run out to get this but it's a nice nude light pink nevertheless. If many of your drugstores are like mine and mostly carry pinks and reds and you like my swatches, go ahead and pick this up. :)


Subscribe to:
Posts (Atom)