Friday, April 13, 2012

The Tempest/Stormy Seas Nail Art


I created this nail art look because for some reason, though it is far from my favorite Shakespeare play, I am reading it for the third time for class. OK, yes, I think he might have been senile at that point. I tried to capture the turbulence of the seas with this look so you have overcast greenish skies and dark blue waters with a lot of spray and sea foam.

I'm going to explain how I achieved this look and then include more swatches at the end. If you would like a video or step-by-step picture tutorial, let me know in the comments.

I achieved this look using the incredibly sophisticated tools of a makeup sponge and a toothpick. The main polishes you need are a green polish, a white polish, a pale green or blue polish, and a dark teal polish. I used Essie's Sew Psyched, Milani White, Essie Who Is the Boss/O.P.I. I Vant to Be A-Lone Star, and O.P.I. Ski Teal We Drop. I also used Essie Bobbing for Baubles and Essie As Gold as It Gets but those steps aren't necessary.

Step 1: Paint your nails with 2 coats of Essie's Sew Psyched. (link to review: http://smartandsarcasticwithdashesofinsanity.blogspot.com/2011/11/review-of-essies-sew-psyched-with.html)

Step 2: Dot a bit of your white polish (Milani White) onto a flat surface. I used an index card but you can use any piece of paper or a plate. Just use something disposable that the polish won't soak through. Take your makeup sponge (available at drugstores and beauty supply stores) and dab it into the white polish. Practice on a non-white piece of paper if you're unsure of how much polish you've picked up. Stamp the white polish lightly over the bottom 3/4 of your nail, leaving the 1/4 around your cuticle green. You want to stamp the polish lightly so this white does not cover up the green. It should just make it a little lighter. Do not stamp in a straight line across the nail. Try and make it a little irregular.

Step 3: Dot a bit of your pale green or pale blue polish (Essie Who is the Boss OR O.P.I. I Vant to Be A-Lone Star) onto a flat surface. Take your makeup sponge (using a clean area) and stamp over the white polish.

(Optional Step) Step 4: Paint a gold flakie polish (Essie As Gold As It Gets) over your nail.

(Optional Step) Step 5: VERY lightly, stamp a dark blue polish over the bottom 1/3 of your nail (closer to the tip of the nail and away from the cuticle). I used Essie's Bobbing for Baubles.

Step 6: Stamp a dark teal polish (O.P.I. Ski Teal We Drop) over the bottom 1/3 of your nail (closer to the tip of the nail and away from the cuticle). If you follow Step 5, then stamp this polish a little lower so you don't cover up all of the polish from Step 5.

Step 7: Now it's time to get creative. Dot a bit of white polish onto a flat surface. Take your toothpick and dip it into the white polish. Practice making tiny dots if you need to. Once you're comfortable with the technique, dot white polish in the area between the green polish and the dark teal polish. Dot the white closer to the dark teal so you get dark teal tips. It is VERY IMPORTANT to make sure these are tiny dots and they are in an irregular pattern. Vary the size of the dots and the placement a little. You are creating the sea spray.

Step 8: Seal with a top coat.


So easy you can even do it on your right hand. I promise!


Did you like this look? Would you like more nail art from me? Let me know in the comments! :)

Monday, April 9, 2012

Update

Hi darlings!

Well, I had a horrible day today. I edged precariously close to insanity what with the repeatedly being on the verge of tears and random bouts of humming and singing. But let's not talk about that right now. Usually I would have something to report after rambling adventures but because I was a little upset today, the most I did was pop into Ricky's. They have the new Essie Wedding collection already and I couldn't resist picking up Who Is The Boss, a lovely muted bluish green. I've got Ms. Milani on my nails right now but I'm putting this new shade on my schedule so you can look forward to that.

I just want you to know how grateful I am that there are some of you out there reading this. I didn't know what to expect when I started my little blog but your support, even if it's just reading a few posts here and there means a lot to me.

Sunday, April 8, 2012

Target PixiGlow Haul

I mentioned these Pixi products twice on my blog in a Things I'm Currently Obsessed With Post http://smartandsarcasticwithdashesofinsanity.blogspot.com/2012/02/things-i-am-currently-obsessed-with.html and when I told you about the sale at Target http://smartandsarcasticwithdashesofinsanity.blogspot.com/2012/02/pixiglow-tote-bag-sale-on-targetcom.html.

Well, I took advantage of the deal and also used it as an opportunity to pick up a Sonia Kashuk Hidden Agenda Concealer Palette. Here are some pictures of that mini haul. So far I'm really happy with the concealer palette and not as happy with the PixiGlow Tink Tint. I think it's one of those pH lip products because while the product is a pretty baby pink, on my lips it changes to a bright pink that's kind of hard to pull off. Also I think it dries out my lips a bit. I have two so I might end up giving the other away. I'll have more pictures of the lip product when I write up a review.


Sephora CHIC Week 15% Off Haul

Hi darlings!

My Sephora Friends and Family haul is one of my more popular posts so I thought you might also like to see what I picked up during their "Chic Week" discount week where 15% was taken off your total purchase in store or online. As an aside, I highly recommend signing up to be a Sephora Beauty Insider to take advantage of these and other discounts if you love trying out beauty products or even just a few high-end skincare and makeup products. It is totally free with plenty of perks.

Anyway, let's get started. I agonized over the decision of what to get until the very last day when I made my choices in store. I thought I was going to get big ticket items but I actually picked up pretty reasonably priced items and two more expensive lip products. I will leave swatches until I have used the products for a while and write up full reviews.
I think I'll share my haul in the order I found the items. (Haul items after the break...)

Thursday, April 5, 2012

REVIEW of Essie's Navigate Her with SWATCHES


This will be a short review as I don't have much to say about this polish. I didn't love it or hate it. This polish comes in a very pretty light green color which is what attracted me to it in the first place. I was ready to place my trust in green Essie polishes after the joy of Sew Psyched. While I wasn't miserable with the choice of Navigate Her, I wasn't thrilled either. I've read it described as pistachio green or pea green. To me, it's the color of a more artificial kind of pistachio gelato if that makes sense to anyone who isn't as obsessed with pistachio gelato as I am. It's a sort of muted green so it is wearable but there is something about that artificiality that threw me off. I suppose I wanted the shade to be a touch different, a little more sophisticated and serene. There may have been too much yellow. I'm not sure. I'm not a polish mixing expert. As far as the formula went, it was not my favorite Essie formula. It was a touch thick and a bit more difficult to work with than usual. If you are in love with this color, I think this is a nice alternative to the light greens from Deborah Lippmann and Dior that have recently come out. However, personally, based on the formula and the color, I would not recommend it.

SWATCHES (more after the break)
Sorry about the lint. :)

Sunday, April 1, 2012

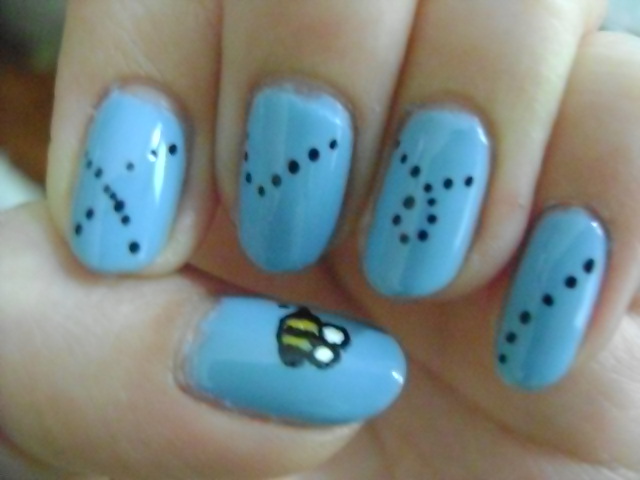
REVIEW of Revlon nail polish in 410 Dreamer with Bumblebee Nail Art

If you follow this blog, you may know that forever and a day ago (December) http://smartandsarcasticwithdashesofinsanity.blogspot.com/2011/12/drugstore-haul-plus-butter-london.html I picked up this (at the time) new Revlon nail polish. It looked like a light sky blue in the bottle, so I wanted to save it for spring. Now that I have it on my nail, it turns out that it dries a little darker than the color in the bottle, leaving me with a dusty cornflower blue that almost seems to have some purple in it in certain lighting. Application was atrocious. I really dislike all the Revlon nail polishes I've tried, and Dreamer was no exception. The formula was so thick it was hard to get even coats but it was thin enough to need three coats to get it opaque. I had to do four coats to even out the streaks. The color seems a little dry on my hands, making them look dark and making my skin look dull. And this was a nightmare to photograph. I have some non-color accurate pics so you can get an idea of how the polish looks, but only a few photos that are anywhere near the actual color. (I will let you know which ones)

I did manage to save the look with some bumblebee nail art. I watched the youtube tutorials from cutepolish and bubzbeauty to get an idea of how I wanted it to look. The bee is based on the cutepolish version and the flight trail is based on bubzbeauty. My suggestions are to not worry about getting the bee perfect because it makes it look more adorable and childlike. I did all of my design wiht a toothpick. The trail looks better if you keep the dots about a dot length apart instead of grouping them together like I did on the nail of my index finger.

Color Accurate
Semi-Color Accurate (should be darker)
Not color accurate (but you can see how thick the polish applied)


NAIL ART

 Semi Color Accurate (should be a little darker)