Saturday, June 14, 2014

REVIEW of Sparitual Lacquer in Copper Shimmer With SWATCHES

Hello chickadees,


I've got a new brand for you today. This is my first Sparitual polish review. I've never tried a polish from the brand before and I wasn't even really conscious of the brand before I purchased the polish but it was on sale at 6pm.com so I picked it up during a larger haul. Apparently, the polish regularly retails for $10 but I purchased it at $4.99. I didn't really have any expectations for the polish, not being familiar with the brand but since it usually costs $10, I was expecting something on par with or better than OPI and Essie in terms of the formula.

Color: Copper Shimmer is exactly what it says on the tin, a copper shimmer polish. Well, actually, that's not quite true. Copper Shimmer looks a lot like a shimmer polish but I would actually describe it as a foil because of the layers that are revealed when you remove it. I think it's a very pretty color but it can look a little rough because of application issues. More on that later. It's also a copper than veers a little bit more towards gold.
Formula: This polish has a thicker formula that makes it a little difficult to work with.
Application: Before I discuss the application, I'll note that I liked the rubberized top that comes with this polish. It's similar to the cap on the Orly Bonder bottles and it gives you a better grip and thus more control of the brush during application. The first coat of polish went on smoothly. I had to even it out a little but I didn't have trouble working with the polish. However, there were visible brushstrokes because of the formula/finish which you'll have to be careful about. You want to make sure you're painting on the polish so all the brushstrokes are straight and pointed in the same direction. I found the second coat to be a little thicker. The polish still went on smoothly but when I tried to even out the polish, it seems to thicken up and it seemed very easy to overwork the polish and make it gloopy. At two coats, the polish was basically opaque. Three coats of polish would have improved the opacity but I left it at two. Application with my nondominant hand was essentially the same though the polish continued to thicken. For some reason the polish seemed gloopier on some nails and not as thick on others.
Wear: Removal was actually pretty easy for a foil. It was only a little tougher to remove than a normal creme polish. I did experience tip wear fairly quickly. I wore this polish for 5 days and by the end of that period the tip wear was very noticeable.

CONCLUSION: If you're in love with copper polishes, I think you might like this one but I would only recommend getting it if you're buying it on sale. I don't think the formula is spectacular though it is manageable.

P.S. Let me know in the comments if you'd be interested in seeing a comparison between this polish and Essie Penny Talk and Orly Rage. It also reminds me a little of Confetti Debutante.

SWATCHES

Chloe + Isabel Sample Sale Haul

Hello bumblebees,

I received a request to do a haul post showing you what I purchased at the Chloe + Isabel sale I attended recently. The sale has unfortunately ended for those of you who might have wanted to shop it but you can still read my report here

Anyway, let's begin with the regular items I purchased from the inventory room. When it comes to jewelry, I gravitate towards earrings as I generally don't like wearing bracelets and really don't deviate much from the same styles of necklaces. But earrings are my vice. I did a jewelry collection post a long time ago and if you'd like I can try and film a video but that will probably take some time as my priority when it comes to videos is trying to figure out how to film nail art tutorials. But enough of that. I purchased four pairs of earrings at this sale. They were each priced at $10.
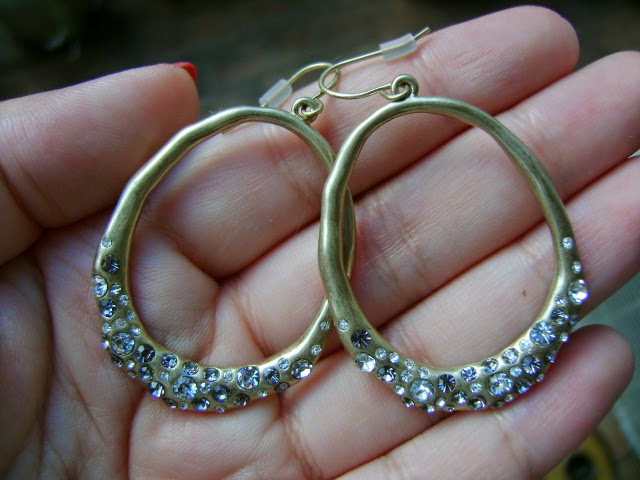
I purchased these large pewter pave hoops which are like a less refined version of my rose gold Alexis Bittar hoops. I kind of like the rougher, more casual look of these earrings. They're a good everyday pair. 
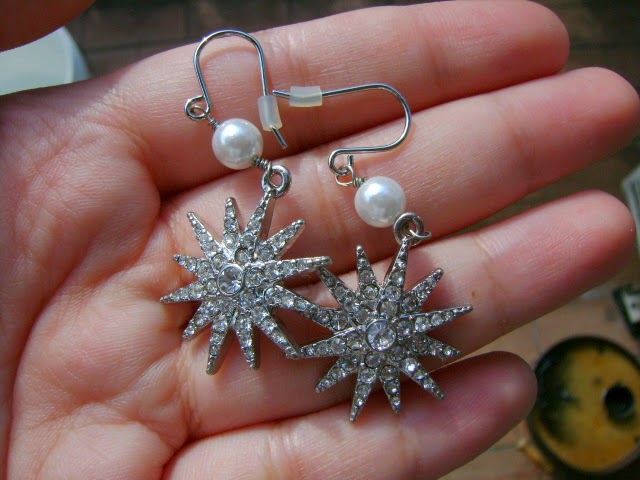
I think I'm also going to get a lot of use out of these adorable starburst earrings. I've been wanting starburst earrings like this for a while so I was so happy to find them at this sale. I think I might remove the pearl to make these look a little more expensive.
One of my favorite finds were these Sunset on the Seine Statement Studs. They normally retail for $34. I think they look so much more expensive than they actually were. It bugs me a little that they're the same earring. That is, instead of purchasing a left earring and a right earring, they seem to have sold me two lefts or two rights. Still, I don't think anyone will really notice and it was a fantastic deal.
I am in love with these Art Deco Trapeze Earrings. They normally cost $42. I think they're so chic as far as costume jewelry goes. I was tempted to get the yellow pair as well but I restrained myself.
I'm not really one for stacking rings or bracelet as I just find wearing a lot of jewelry to be heavy and extraneous but I think I'll be wearing this set of 6 Stackable Rings in one arrangement or another quite often. All six rings only cost me $10.
This Engraved Spinner Pendant Necklace is not just adorable but also lots of fun to play with. I can be a little fidgety and I expect that I won't be able to resist toying with this when I'm nervous. This is normally priced at $38 and only cost $20 at this sale. I think $20 is about the most I'd pay for a necklace of this quality.
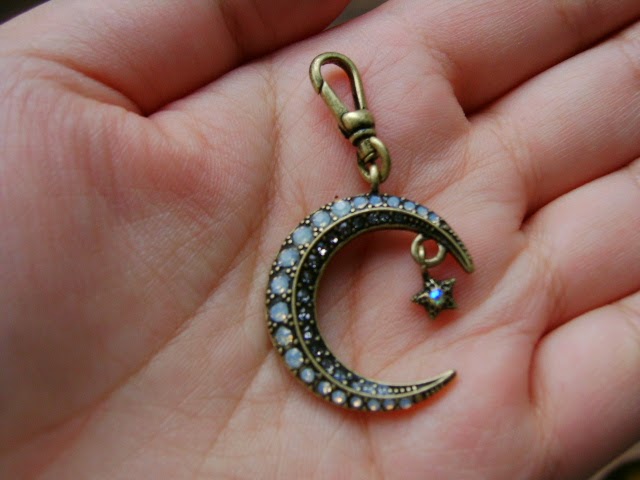
Finally, I purchased a Tresors Moon and Star Charm which normally costs $32 for $10. I think the little star really pushes it to a must have item.

Now, for the haul from the damages room. If you'll recall from my review, all of the following items only cost me $10.
Most of the items I found don't seem to be damaged or are barely damaged. This rose gold pave branch bracelet seems to be in perfect condition, as does this tri-tone bangle set and sparkly stretch bracelet.
I also can't find anything wrong with this Tresors Horseshoe Charm or Tresors Birdcage Charm.
This Coral Branch Cuff is in fine condition even if the color is a little off. It isn't terribly tarnished and I'm sure I could polish it or soak it in some solution that would bring it back to its normal gleaming gold state.
The same could be said for this coral necklace which has all its stones but is slightly off-color.
These Nested Bellflower and Pearl Earrings seem to be in perfect condition.
Now I don't mean to suggest that there was nothing damaged in the damages room. This Stone Embellished Collar Necklace which I've actually been coveting for a while was thrown into the damages room simply because it's missing one stone. This is a bit ridiculous as a different version of the same necklace with a more complex pattern of colored stones was being sold for $40 as a statement necklace in the inventory room. I'm not going to complain, though. It shouldn't be too hard to find a rhinestone to fit the setting and until then, I have no problem wearing this necklace as is.

Friday, June 13, 2014

REVIEW of Ginger+Liz Colour Collection Polish in Got My Groove Back

Hello my little gold stars,


This is where I'd make a sassy joke if I'd ever watched How Stella Got Her Groove Back but I haven't so feel free to insert your own joke here. Anyway, I decided to attend my second concert at the 92Y, which sadly was not as good as the first concert for various reasons that I will not bother getting into here, and I decided to celebrate with a flashy manicure without the excess of a ton of glitter. I wasn't even thinking that I'd worn Ginger+Liz Tuck Me In to the last concert. It's funny how these things work out.

Color: Ginger+Liz Got My Groove Back is a cold-toned gold foil polish. It isn't quite as rough as other foils that I've tried like Orly Rage but it does have a grittiness to it and visible brushstrokes. There isn't much more to say than that. It's flashy but because the texture is a little more smooth and more similar to a shimmer than other foils, it keeps the polish a little subdued all things considered.
Formula: I didn't find the formula to be particularly thin or thick in consistency.
Application: The first coat went on smoothly without any drag on the brush but I did have to even the polish out a bit. The brushstrokes were visible so I would advise you to be very careful about making sure all your brushstrokes are going in the same direction. Oddly, the shimmer both emphasizes and disguises the brushstrokes. At one coat, the polish is already quite shimmery. Application of the second coat also went very smoothly. I found the polish very easy to work with aside from the slight concern of evening out the polish while making sure the brushstrokes were all straight and pointing in the same direction. At two coats, this polish still doesn't pass the light test (it was particularly sheer when I was painting with my nondominant hand) so a third coat of polish was necessary. The polish is opaque at three coats.
Wear: The polish wears nicely with only minimal tip wear after a few days. My only issue with it is that while removal is generally easy, particularly for a foil polish, there are these little bits of glitter that linger on the nail and refuse to come off no matter how hard you scrub. This is why glitter is the herpes of art supplies. For me, it isn't a dealbreaker but it's something to keep in mind if you're thinking of transitioning from this polish to say, a semi-sheer nude.

CONCLUSION: Yeah, I would totally recommend this polish. Application is easy. It wears nicely without too much damage. Really the only issues are the visible brushstrokes and the lingering glitter. Because of the visible brushstrokes, I might recommend this a little more highly for someone who considers themselves at least at the intermediate level when it comes to doing their own manicures.

SWATCHES

Thursday, June 12, 2014

Chloe + Isabel Sample Sale Report June 2014

Hello darlings!
I am just back from the Chloe + Isabel sample sale taking place at 122 Hudson St between N. Moore St. and Ericsson Place (fifth floor). Yes, I know it's late to be posting a sample sale report, but the sale opened today (Thursday June 12) at 4:00 pm. If you'd still like to attend, the sale closes today at 9:00 pm and reopens tomorrow from 11:00 am to 6:00 pm. Yup, that's only a few hours of shopping time which is why I'm rushing to get this post up.
I sent an RSVP ahead of time but it was absolutely unnecessary. They do ask you to sign in with your email address which I did as a courtesy since I showed up a little early. There is no coat or bag check. There will be restocking but I wouldn't count on any markdowns given the dramatic discount and the fact that this is a two day sale. Both cash and credit is accepted.
So, let's get down to business. For this sale, you're going to want to bring your A game. First, you have the option of going to the "inventory room" or the "damaged room." You'll have to make this call for yourself though they "encourage" you to go to the inventory room first. I, of course, went to the inventory room first to scope out the stock for you ladies. When I was there everything was laid out neatly on the tables but as there are no clear dividers, things might get a little disorganized if the sale gets very busy. The price list is fairly simple to follow but make sure you're paying attention to which items are "statement" necklaces and earrings and which are just normal necklaces and earrings because there is a significant price hike. I saw a lot of items that are still being sold on the website at the regular retail price so don't hesitate to scoop up things you like. You're getting a great deal on all of the merchandise.
I spotted the Ocean Lace Long Pendant Necklace (retail $68) with the Statement Necklaces.


Sorry I don't have better photos. Everything was wrapped up in these plastic bags.
I wasn't really sure what was in the Sterling Silver basket but I did spy this cute wishbone ring.

Monday, June 9, 2014

REVIEW of Butter London Nail Lacquer in Dosh With SWATCHES

Hello chickadees,


Perhaps you're wondering why I'm reviewing another Butter London polish when I haven't had the best luck with the brand in the past. Well, you know I find it hard to pass up a sale and these polishes were recently on sale at Ricky's so I picked up two of them. Also, this shade of green kind of reminds me of Wicked in the bottle so how could I pass up the fabulousness of that? OK, basically I have a problem. You're reading this blog. You already know that.

Color: Butter London Dosh is a medium green shimmer polish. I don't mean to mislead you when I call it a shimmer because it doesn't have the look that I associate with a traditional shimmer. Instead of looking like a creme with a shimmery quality, Dosh feels more like one of those shimmer/flakie hybrids that I feel like I keep running into like Zoya Seraphina. However, it doesn't have that flakie consistency where it seems to apply in little flakes of polish. Actually, you know it reminds me a lot of the Sinful Colors shimmers like Firefly. I'm surprised it has a kind of cheap look for such an expensive polish. As for the shade of green, I would describe it as swampy. It's like a grassy, leafy green that has a slightly muddy, sickly quality. In spite of that, I like it. It's one of those colors like chartreuse that should be ugly but actually kind of works. I think the shimmer can appear to be light gold or more of a silver depending on the lighting.

Formula: Dosh has a thick formula that is very sheer. This is my least favorite kind of polish formula.

Application: Full disclosure, the brush that came with this polish was broken so the application process involved a lot of shenanigans. I'm fully aware that this may have affected the application but A) It's Butter London's damn fault for making a defective product and B) I still think the formula was mainly to blame for the poor application.

Let's begin with the application of polish using my dominant hand. I used the brush (yes, the broken brush) that came with the polish for the first two coats. The first coat of polish went on a little streaky and worrisomely sheer. I found the second coat of polish to be thick. I had to even it out with the brush which was difficult with the polish getting a little gloopy. The polish was nowhere near opaque at two coats. With the third coat, I decided to switch to a Maybelline gel liner brush I had lying around. Application was the same and the polish was still not opaque at three coats. I added a fourth coat because I hate myself, going back to the regular brush that came with the polish. At four coats the polish was more or less opaque but it wasn't fully opaque because of the patchiness and balding caused by the uneven application.

So normally I wouldn't have finished this manicure but I had somewhere to go so I continued to put myself through the torture of applying this polish. To apply polish with my nondominant hand, I decided to clean off an old Orly Bonder brush and use that to apply the polish. I still found the first coat of polish to go on streaky and sheer. The second coat still had to be evened out and the brush created ridges in the polish. However, there was no drag. I found application very similar to application with my dominant hand. I required four coats of polish for any semblance of opacity and I got a very uneven patchy manicure for my troubles.

Wear: I generally apply my polish at night. I applied this polish the night of May 26. By May 28 I already had a lot of tip wear. That is terribly disappointing, especially for a mid-range/high-end brand like Butter London that retails at $15. If you haven't been reading my reviews for a long time, you may not know that my polish almost never chips and I generally only get tip wear days into wearing a polish. So for me, tip wear on day two is unacceptable. I imagine that if you are someone whose polish often chips, this polish is going to be a disaster for you.

CONCLUSION: I can't in good conscience recommend this polish. Even without the broken brush, I think the formula is kind of awful and I started to get tip wear after two days. Really after maybe one day as I already noticed the tip wear in the afternoon on the second day. The only thing I could recommend this polish for is the color which is somewhat unique but it's also not going to be something for everyone. If you're looking for a pretty, grassy green, it's not a dupe, but I would go for Sephora by OPI Leaf Him At the Altar.
 
Cat is a participant in the Amazon Services LLC Associates Program, an affiliate advertising program designed to provide a means for sites to earn advertising fees by advertising and linking to amazon.com. If you would like to help support this site, please consider making your next purchase at amazon.com through the links on my page. I will get a small percentage of anything you purchase through one of my links at no extra cost to you.
SWATCHES

Thursday, June 5, 2014

Orla Kiely Sample Sale Report June 2014

Hello peanuts,

I'm just back from the Orla Kiely sample sale. The sale is taking place from today, June 5 through Saturday June 7. The sale opens every day from 11:00 am through 7:00 pm at 5 Mercer St between Grand and Canal. I was at the Natori sale this morning but I didn't feel up to covering it fully. I try to only cover sales that you still have to time to shop and sales that I can give you a full picture of. That is why I did exhaustive reconnaissance for this multi-brand sale.

First, let's get all the basic information out of the way. There is no coat and bag check. As far as I can tell they've simply set up the regular Orla Kiely store for sale. There are also no dressing rooms. This is crazypants. There is no place that's even curtained off and the mirrors are in the front of the store. While I was there, a random dude came in the store. Not cool. I asked and was told that they will not be restocking unless it's to replenish the merchandise that's already and that there will not be any markdowns.

OK, now we can get into the actual sale. Each brand is conveniently sectioned off and sizing, pricing, and merchandise varies greatly from brand to brand. Let's start with Orla Kiely. I did not look at all the bags, because I was trying to not go insane, but all of the bags I did check were under $200. Obviously larger bags will be at the top of that range. Wallets and smaller purses were more in the $40-67 range and there were also two boxes with damaged bags. I rifled through the boxes but I couldn't really tell how they were damaged.
This olive colored Small Jeanie Bag was $110.
This olive Medium Laptop Skin was $55
This navy Make-up Bag was $45.

There was a table in the middle of the store with bags that felt a little cheaper and plastic as well as various wallets.
The wallets seemed to be priced differently based on size and material. The two pretty patterned ones in this photo were $67.