Wednesday, February 27, 2013

EXHIBIT REVIEW Sophie Gimbel: Fashioning American Couture

Hello darlings!


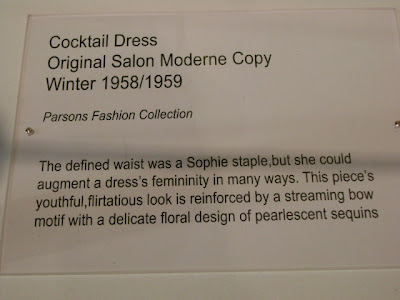
Now I know I have international readers and readers who simply can't make it to NYC to see a small exhibit at Parsons. I certainly don't have the time to visit every museum exhibit I'd like to see. So as a special treat, today I'm bringing you a picture post with most of the designs from the Sophie Gimbel Fashioning American Couture exhibit. I did not include all the posters and artwork that accompanied the exhibit.

For the most part, I found it a well curated exhibit that highlighted the craftsmanship and ingenuity of Gimbel's designs and gave someone like me who wasn't familiar with her work a good impression of her style.


DKNY Sample Sale

Hi chickadees!

You've probably already heard, but in case you haven't, DKNY is once again bringing their sample sale to 260 Sample Sale. All the sale info is in the flyer below. I will be attending the sale to let you know what to expect should you want to attend.

Saturday, February 23, 2013

REVIEW of Essie Jelly Apple With SWATCHES

Hello my darlings,
I have finally found a red creme polish that I love. Unfortunately, it's a pain in the arse to photograph for swatches. After multiple attempts I began to approach color accuracy but I definitely didn't manage to get all the way there. Although it's a true red polish, in my photos it kept pulling orange. I actually threw out swatches where this polish basically looked orange. It was very frustrating. I'm only telling you this as a preamble because I don't want the swatch at the top of the review to dissuade you from continuing to read if you don't like orange polish. Trust me, this is not an orange polish in the slightest.

Color: Essie Jelly Apple is a true red creme polish. It provides a nice pop of color to the nails, especially in winter and it's just a touch brighter than what I would call a "classic" red. I would call it a bright tomato red, though in dim lighting it approaches that classic red shade.
Formula: The formula was one of those perfect Essie formulas. Thin enough to be the perfect consistency for easy application.
Application: Application was very smooth. I thought the polish looked relatively opaque in two coats, but I hadn't painted it flush to the skin on the sides of the nails so I went in with a third coat to fix that up.

CONCLUSION: I would absolutely recommend this polish. I may even pick up another bottle so I'll have a back-up of my new favorite red.
SWATCHES

Friday, February 22, 2013

Drugstore Product Stalking: Duane Reade 4 W 4th St

Hello bumblebees,

Another quick Drugstore Product Stalking post today. Lots of pictures. And lots of new products. (Click to enlarge image)
L'Oreal Caresse Aqua Lacquer $10.49
L'Oreal Colour Riche Balm $9.49


L'Oreal Colour Riche Eye Shadow $8.49
Nicole by OPI Selena Gomez Collection $8

Wednesday, February 20, 2013

Look For Less: Kate Spade Be Mine Earrings vs. Forever 21 Heart Studs

Link to Kate Spade earrings: http://www.katespade.com/designer-jewelry/designer-earrings/be-mine-studs/WBRU4168,default,pd.html?dwvar_WBRU4168_color=711&start=27&cgid=jewelry-earrings

Link to Forever 21 earrings: http://www.forever21.com/Product/Product.aspx?BR=f21&Category=acc_jewelry&ProductID=1028325529&VariantID=

Sunday, February 17, 2013

REVIEW of OPI French Quarter For Your Thoughts

Hello my little honey bunches of oats, (still trying out the new endearments)


I don't know why I keep buying gray and nude nail polishes when I'm far more into color but I guess I keep thinking that one day I'll find that perfect polish and I can stop my search and just stock up on that color. Anyway, after the disaster that was China Glaze Elephant Walk, I was feeling a bit discouraged but in the gloominess of February I really couldn't see myself pulling out a bright coral to cheer myself up. So instead, I took out the bottle of O.P.I. French Quarter For Your Thoughts that I picked up during my drugstore.com haul however long ago. As a quick aside, I think that's a really adorable name. It comes just short of making complete sense combining "french quarter" with "a penny for your thoughts" but somehow the inconsistency makes it work. Enough rambling. Shall we get into the review?

Color: I hesitate to call OPI French Quarter For Your Thoughts a light gray creme polish because I'm afraid the word "quarter" in the name might give you the wrong impression. The gray of this polish is somewhat muddied so that in dim lighting at times it almost seems like a light beige latte kind of color. It's a very warm gray. The swatches are pretty color accurate so I'll stop trying to describe the color and let you just take a look at them at the end of the review.
Formula: Like other OPI polishes, this polish has a thinner consistency which I find easier to work with. It was almost opaque in two coats but I still needed three to get full opacity.
Application: Application was very smooth but this is not the kind of polish that you can really work with to cover the nail. That is, I wouldn't go over the same spot with the brush as the brush is a little streaky and it could drag ridges into the coat you just painted. I noticed some overlapping brushstrokes at the base of my nails but it didn't really bother me too much.
Wear: I wore this polish for four days. During that time I had a little bit of tip wear but the main reason I removed the polish was because my nails were growing out and there was a noticeable gap at the nail bed.

CONCLUSION: I would recommend this polish. It's a nice, neutral, flattering warm gray and though the brush leaves something to be desired I think you should be able to work with this polish just fine. It is one of the better polishes in this color family that I've tried.

 SWATCHES (Note: If there are any bubbles, they are from my Seche Vite.)

Saturday, February 16, 2013

REVIEW of Bobbi Brown Creamy Concealer Kit in Sand

Hello my little pea shoots,

I'm trying to stop using "chickadees" since it doesn't really have any significance for this blog so I decided to go with something equally nonsensical. We'll see how it goes. Anyway, longtime readers of this blog (and former chickadees) will know that I have been looking for a good concealer for ages, basically since I started using makeup. But it's very difficult for me to find something that looks natural, gives the right amount of coverage, and won't fade during the day. I've tried liquid concealers. I've tried cream concealers. I've tried high-end brands and drugstore brands. So far I haven't had much luck (though I was liking my Shiseido concealer before I lost it during my trip to California. I'll have to get another one and keep testing so I can tell you what I think.) After hearing so many good things about this product from beauty gurus and bloggers online, I decided to go to Sephora and let the salespeople help me pick out the right shade. I settled on Sand.

Color: I would have thought that Sand would be too dark for me but it was actually a decent match and maybe still a little too light. I know it sometimes doesn't seem very hygienic to apply makeup from the testers in Sephora but I think it's important to at least swatch them to get an idea of what shade you need. I thought Sand was a decent match for me. I am fairly pale (I used to use L'Oreal foundation in n2 or n3 if that helps) but I have very noticeable brownish dark circles. My eyelids are also a little dark and my glasses cast even more of a shadow under my eyes. I found that when I blended Sand in, the color matched with the rest of my face reasonably well but during the day as the product faded and began to collect in spots, the product in those spots seemed too light and stood out from my dark circles.
Application: Obviously a cream concealer isn't going to apply as smoothly as a liquid but I thought it was reasonably easy to blend. I preferred using my fingers to a brush as I find that using a brush with a cream concealer can involve a lot of tugging whereas the heat of your fingertips can easily melt and blend in the product.
Coverage: Coverage was just terrible for me. I have dark circles but I haven't had this much trouble trying to cover them with the other products I've tried. Thus, I'd call this concealer light coverage. If I were to just pack it on, I might say it was medium coverage but any way you try to blend it in for a natural look, you're not going to get sufficient coverage for your dark circles. If you try to build it up, then it starts to look cakey. Also, it accentuates the small bumps I have under my eyes and I think it might do the same if you have deeper wrinkles.
Wear: I've tried this with and without setting powder and no matter what, it always wears away. I tried it with the setting powder in the kit and I tried it with my Make Up For Ever HD powder and neither one helped this concealer last for more than maybe 3-6 hours. The 6 hours is generous as that was the first time that day when I was able to examine my under eye area for fading. It's quite possible that it had started to fade before then. And when I wore mascara while also wearing this concealer, I felt like it was causing my mascara to smudge more than it usually does.
Price: The Bobbi Brown Creamy Concealer Kit cost $33. It's definitely more than what you'd be paying for a product from the drugstore, but I think it's only a slight splurge considering you're getting a cream concealer and a setting powder.
Packaging: I like the packaging is compact and neat enough to fit in your purse. It manages to be easy to open but secure enough that I didn't have to worry about it opening and making a mess if I decided to take it with me for touch ups during the day.

CONCLUSION: I know some people love this so it may just be an issue of my specific beauty concerns but if you have drier skin and dark circles and you need something that's going to last you throughout the day without touch-ups, I would not recommend this product. I returned mine to Sephora and I'm still on the hunt for a good concealer.

SWATCHES

Wednesday, February 13, 2013

REVIEW of China Glaze Elephant Walk

Hi chickadees!

This is my first China Glaze polish. The brand isn't as readily available near me and there are already so many other nail polish brands that are right there in the drugstore, I could never bring myself to order a color that seemed easy to dupe from amazon or ebay. Anyway, I was out in California recently and I was able to stop into an Ulta where I picked up 3 China Glaze polishes. Elephant Walk is the first one I decided to try as it's really the one I wanted the most of the three that I bought.

Color: Elephant Walk is a warm gray creme polish with hidden shimmer. Gray is difficult to describe as it's more of a shade/tone than a color. If it helps, I would say it's in the middle of the spectrum between something light like Zoya Dove and something dark like Essie Power Clutch. I think gray polish is automatically going to look more chic than most other colors. The shimmer is really not apparent unless you're looking at the polish under a strong light source about a foot from your face. But the shimmer is pretty when you can see it.
Formula: The formula wasn't particularly thick or thin but it was difficult to work with.
Application: Since this was my first China Glaze polish, I paid extra attention to each stage of application. The first coat was very streaky but first coats may not be great even for the best formulas. The second coat was still streaky. The third coat and top coat managed to even out most of the streaks though I did have a nail that I was beyond saving that I had to do over. However, the polish was thick enough that you could definitely see where the brush strokes overlapped at the base of the nail, especially when I painted my nails with my nondominant hand.
Wear: And here is where I decided I hated this polish. I painted the nails on my left hand on 2/2 and the nails on my right hand on 2/3. On 2/4, I had crazy tip wear on all of my nails and a big chip on one of the nails on my right hand. That's right, a day later I had a chip. And in case that wasn't bad enough, my polish never chips. Seriously, except for slight tip wear and growth at the nail beds, I could wear the same polish for weeks without any chipping.

CONCLUSION: Elephant Walk is a nice color and the formula is relatively manageable though it is somewhat hard to work with and I had to deal with a lot of streakyness and overlap. But my biggest problem is how quickly it started to chip. So no, I would not recommend this polish.

SWATCHES

Friday, February 8, 2013

Drugstore Product Stalking: CVS 20 University Place

Hi chickadees!

Picture post today. See my last Drugstore Product Stalking post for prices. http://smartandsarcasticwithdashesofinsanity.blogspot.com/2013/02/drugstore-product-stalking-price-check.html
Maybelline Color Whisper
 Maybelline Colorsensational Lipstick "Vivids" Collection
 Maybelline Colorsensational Lipstick "Vivids" Collection
 Maybelline Colorsensational Lipstick "Vivids" Collection
Maybelline Colorsensational High Shine Gloss

Update


Hi chickadees!

After what seems like forever my lips finally look and feel healthy again. After my last few allergic reactions, I'm a bit frightened of my Maybelline Colorsensational lipsticks. I do find it a bit odd that I've never been allergic to them before and yet I'm apparently allergic to the ones I bought from drugstore.com. I may have to look into that and buy the same color from the drugstore and see if I have the same reaction. But anyway, as for right now I still need to choose a lip product to start testing for a week. I have narrowed it down to these options...

Revlon Lip Butter in  Lollipop
Revlon Kissable Balm Stain in Rendezvous
Covergirl Natureluxe Gloss Balm in 215 Hibiscus
Covergirl Natureluxe Gloss Balm in 270 Spice
YSL Rouge Pur Couture Glossy Stain in 8 Orange de Chine
Revlon Lipstick in Black Cherry

I'll get around to reviewing all of them eventually but which product would you like a review for first? If no one ends up commenting I'll just choose one of these options myself and surprise you.

Thursday, February 7, 2013

REVIEW of Essie Da Bush With SWATCHES

Hello chickadees!

Now every nail polish addict has a polish in her life that she desperately wants but resists buying. Sometimes more than one, which could be a good thing or a bad thing depending how you look at it. For the longest time, Essie's Da Bush was that polish for me. I'd seen swatches of it online and I thought it would be incredibly flattering for my skin tone but I couldn't find it anywhere and didn't feel a strong enough craving to buy it online. Sometimes you get into that frame of mind where you feel like if something's meant to happen, the stars will align and it'll happen on it's own. And then one day I was in Eve Beauty Source in Soho and there it was, minding its own business. And I stared. And bit my lip. And waffled and wandered and wavered until I finally took the darn bottle up to the cash register and paid for it. And like any good result of contradictory impulses I'm still unsure of whether I made the right decision.

Color: Da Bush is a lovely, dusty pale green creme polish. I would call it a grayish green but that gives the impression that it's a dull, depressing color. It isn't. In truth, it's just as beautiful as I thought it would be from the swatches I've seen online. It is such a flattering shade, perfect for my skin tone, subtle enough to be a nude and with enough green to make it interesting on the nails. Indoors, I sometimes think it has somewhat of a brown/beige tint mixed in with the grayish green. It can also look like a basic gray indoors if you're not really focused on identifying the color. It's the same way a dark polish color can end up looking like black indoors. While I think it's beautiful on its own, it would also make a lovely base color for nail art.
Formula: The formula is on the thinner side and somewhat more sheer than I would like.
Application: Here's where we run into a problem. The first coat was streaky on the nails where I wasn't careful so this isn't an easy application. You have to be very aware of what you're doing and adapt your technique based on how the polish is behaving. On the second coat, I noticed that the brush seemed to be creating streaks/ridges in the polish. On the third coat, I used a thicker coat of polish and angled the brush so it was almost flush with nail and the brush could barely run through the polish. On the third coat the polish was opaque but could still see a few small spots during the light test because of the streakyness during application. I will say that Seche Vite evened out a lot of the small ridges. About 1.5 feet from my face, I can't see an issue with my nails, for instance when I'm typing, but if I'm any closer I can see where the coats of polish overlap unevenly.

CONCLUSION: If you're like me and you are dying to have this color you might be able to deal with the issues with the formula and application. It's certainly not the worst polish I've ever tried but it's a little tricky and it takes some work.

SWATCHES

Tuesday, February 5, 2013

Drugstore Product Stalking: Price Check

Hi chickadees!

I didn't bring my camera with me today as I didn't anticipate going on a trek all around the city and hitting up three major drugstores all the way. So this Drugstore Product Stalking doesn't include any pictures. However, I did make a list of products and prices. I put an asterisk if two products were found at different stores so it's easier for you to compare prices.

UPDATE: Went back to CVS so now I do have some pictures. :)

CVS: 20 University Place
  • Maybelline The Rocket Volum'Express Mascara $8.49 (in Brownish Black, Very Black, and Blackest Black)
  • Maybelline Dream Lumi Touch Highlighting Concealer $8.99*
  • Maybelline Color Whisper Lipstick $8.49 
  • Maybelline Colorsensational Vivid Lipstick Collection $8.49
  • Maybelline Colorsensational High Shine Lip Gloss $8.49*
  • NYC Big Bold Curl Mascara $4.99
  • NYC Applelicious Glossy Lip Balm $3.39 
  • Nicole by OPI Selena Gomez Collection (Glitter polishes spotted) $7.99*
  • Revlon ColorStay Ultimate Suede Lipstick (a few lipsticks spotted) (around) $11.50*
Rite Aid: 501 6th Avenue
  • Maybelline Dream Lumi Touch Highlighting Concealer $7.59*
  • Maybelline Colorsensational High Shine Lip Gloss $7.19*
  • L'Oreal Telescopic Shocking Extensions Mascara $9.99 
  • L'Oreal Revitalift Miracle Blue (around) $26
  • Revlon ColorStay Ultimate Suede Lipstick (Full collection spotted) $9.99*
Duane Reade: 60 Spring Street

  • Nicole by OPI Selena Gomez Collection (Full collection spotted) $8*
  • Nicole by OPI Modern Family Collection (Full collection spotted) $8
  • Essie Snakeskin Magnetic Polish Repstyle Collection (only one or two polishes spotted) $8

Thoughts on Writing: Finding Inspiration... Fairy tales

Hello darlings,

As I prepare to embark on this journey, I find myself faced with endless possibilities. Which road to take depends on where you derive your inspiration. Now, I've spent years writing reviews, recaps, fanfics, and academic assignments that comment on an existing piece of art. Perhaps in another post, I'll tackle the concept of writing a truly "original" story but for now I'll stick to something a little safer and talk about my sources of inspiration.

Every romance is rooted in the social and cultural experience of the author and the romantic literary tradition that preceded it. Each generation builds upon the work that previous generations have done whether or not they are conscious of the actual source material. But, as I've said, I've always been very conscious of the places from which I draw inspiration. I bookmark websites. I keep notepads full of quotes. I keep journals full of magazine clippings. And I've recently discovered the wonder of Pinterest. ;)

But for me, one of my biggest sources of inspiration has to be fairy tales and mythology. I grew up during the height of the Disney Renaissance. And like many children, fairy tales and mythology were what drew me into the library and into Barnes & Noble. Fairy tales are what drew me into fantasy and young adult fiction. And of course all those Disney films spurred my other loves like musicals and art and animation.

Now, when I think about actually sitting down to write a novel, the first thing that comes to mind are the stories I've always wanted to write about. Other than doing retreads of the stories that everyone knows, I've always wanted to try my hand at The Six Swans, The Goose Girl, Manyfurs, East of the Sun and West of the Moon, and Maid Maleen. Yes, I was the little girl with the complete collection of Grimm fairytales. While I think you could easily make adapt these stories for adults, I think they really belong in the young adult section. I think there's something valuable in not just inventing new female characters, but resuscitating female characters that are already present in our culture and fleshing them out and giving them new life. And I've been wanting to write what I consider real strong female characters for years.

As for an original story, I've had a few stalled attempts over the years. Often they just come across as mimicries of other characters. My most recent attempt to do a take on Little Red Riding Hood fell flat. For me, there are two problems with doing an original story. 1. Effective world-building is incredibly difficult. J.K. Rowling may not be the world's greatest author but one of the reasons the Harry Potter series is so captivating is that it managed to pull in so many fantasy elements while maintaining a coherent vision. I've never been the kind of writer who was all that focused on the setting or on magic and fantasy over realistic characters so learning how to utilize those elements would be difficult. 2. A fairy tale has to have a motivation. Whether openly acknowledged or not, the most successful fairy tales are based on some societal or personal anxiety. Fear of the big bad wolf... whether it's his masculine sexual desire or his animalistic qualities and existence outside of the bounds of proper society in the unknown foreignness of the woods. Marriage as a means of social mobility or of obtaining security in a patriarchal society where women are forced into competition for resources. And right now I don't have a compelling character in my head who has an anxiety that needs resolution. Or maybe I do and I'm not ready to tackle it. The last thing I want to do is invent a character and end up with a Mary Sue.

Ah, well, that's enough work (and inane rambling) for today. I hope you're deriving some enjoyment from accompanying me in my writing process.

I'll check in again soon. :)
-Cat

Monday, February 4, 2013

REVIEW of Butter London Wallis With SWATCHES

Hello chickadees,
I've been wearing Butter London Wallis for a week and my final conclusion is that this is a pretty hideous color. I'm not using "pretty" as a modifier for "hideous". I mean that this polish is both pretty and hideous. But it was an improvement over the last Butter London polish I tried (Artful Dodger) and for that I'm grateful.

Color: Butter London Wallis is a blackened gold glitter polish. It's composed of very fine glitter, similar to Revlon Carbonite so the surface of the polish is still smooth. The glitter gives the polish a lot of depth and depending on the lighting, it can take on a green cast which kind of reminds me of evil snakes. I don't know why. It just strikes me as a dragon-like color. I'm not sure it really suits my skintone, thus the "hideous" but it's kind of one of those colors that is so dominant and aggressive that it kind of wears you more than you wear it. I think it would look gorgeous with darker skintones but if you're OK with a bit of clashing, it could work for almost anyone because it kind of stands apart from the nails almost like an accessory.
Formula: The formula is very thin and very sheer. From the first coat, you get a lot of shimmer and glitter but you don't get a lot of coverage on the nail. I'd almost like to layer this to see how it would perform as more of a top coat.
Application: Application was very smooth, which was a pleasant surprise after the mess of Artful Dodger. However, I did need four coats for opacity. The first coat was very sheer. The second coat was still very sheer and there were a lot of bald patches. The third coat still failed the light test (where you hold you nails up to the light and see whether light passes through them) in spots because of the uneven coverage so I added a fourth coat.

CONCLUSION: Any polish that takes four coats to be opaque is a giant pain in the arse but Butter London Wallis has a lot of depth and application is very smooth. So I'd say that if you're willing to put in the time, I think the color and formula are worth it for someone who thinks blackened greenish gold nails sounds like a good idea. :) This polish is for a very specific kind of girl.
 
SWATCHES

Sunday, February 3, 2013

Random Nail Art Experiments

Hi chickadees,

I just thought I'd share the random nail art experiments I've been collecting. None of them are quite successful enough for a full tutorial but I thought you might like to see what I've been working on and maybe the designs or color combinations can inspire your own work. :)

I was trying to mimic the Mulberry logo. I should have planned out the spacing and size and direction of the spots better. The base color is Sally Hansen Red Zin and the design was made with Essie Penny Talk and an old pen used as a dotting tool.
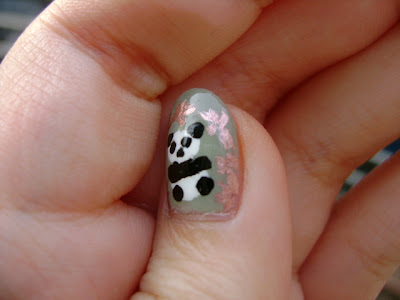
This is my first attempt at panda nail art. He's flanked by two stalks of bamboo. The base color is Essie Da Bush. For the body, I freehanded two white spots with Zoya Purity and then dotted on all the details with Essie Licorice and various tools. For the bamboo I used Essie Penny Talk.


This was my attempt at a design for Wuthering Heights. I used the same stamping techniques that I used with my Tempest nail art design but I couldn't figure out the trees. The green is Zoya Gemma. The hint of purple is  Zoya Pinta. The white is Milani White. I can't remember what color I used for the blue at the top. and the tree is Milani Black Magic.

This is my abstract fire design. I bought some cheap disposable nail art brushes and I was trying to see how they would perform on the nail. The base color is Zoya Blaze and the fire is Essie Penny Talk.