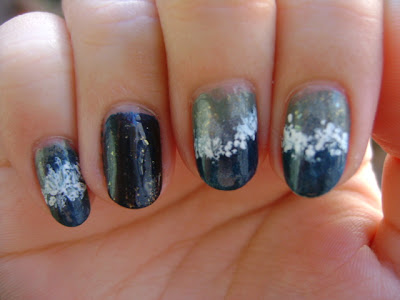
I created this nail art look because for some reason, though it is far from my favorite Shakespeare play, I am reading it for the third time for class. OK, yes, I think he might have been senile at that point. I tried to capture the turbulence of the seas with this look so you have overcast greenish skies and dark blue waters with a lot of spray and sea foam.
I achieved this look using the incredibly sophisticated tools of a makeup sponge and a toothpick. The main polishes you need are a green polish, a white polish, a pale green or blue polish, and a dark teal polish. I used Essie's Sew Psyched, Milani White, Essie Who Is the Boss/O.P.I. I Vant to Be A-Lone Star, and O.P.I. Ski Teal We Drop. I also used Essie Bobbing for Baubles and Essie As Gold as It Gets but those steps aren't necessary.
Step 1: Paint your nails with 2 coats of Essie's Sew Psyched. (link to review: http://smartandsarcasticwithdashesofinsanity.blogspot.com/2011/11/review-of-essies-sew-psyched-with.html)
Step 2: Dot a bit of your white polish (Milani White) onto a flat surface. I used an index card but you can use any piece of paper or a plate. Just use something disposable that the polish won't soak through. Take your makeup sponge (available at drugstores and beauty supply stores) and dab it into the white polish. Practice on a non-white piece of paper if you're unsure of how much polish you've picked up. Stamp the white polish lightly over the bottom 3/4 of your nail, leaving the 1/4 around your cuticle green. You want to stamp the polish lightly so this white does not cover up the green. It should just make it a little lighter. Do not stamp in a straight line across the nail. Try and make it a little irregular.
Step 3: Dot a bit of your pale green or pale blue polish (Essie Who is the Boss OR O.P.I. I Vant to Be A-Lone Star) onto a flat surface. Take your makeup sponge (using a clean area) and stamp over the white polish.
(Optional Step) Step 4: Paint a gold flakie polish (Essie As Gold As It Gets) over your nail.
(Optional Step) Step 5: VERY lightly, stamp a dark blue polish over the bottom 1/3 of your nail (closer to the tip of the nail and away from the cuticle). I used Essie's Bobbing for Baubles.
Step 6: Stamp a dark teal polish (O.P.I. Ski Teal We Drop) over the bottom 1/3 of your nail (closer to the tip of the nail and away from the cuticle). If you follow Step 5, then stamp this polish a little lower so you don't cover up all of the polish from Step 5.
Step 7: Now it's time to get creative. Dot a bit of white polish onto a flat surface. Take your toothpick and dip it into the white polish. Practice making tiny dots if you need to. Once you're comfortable with the technique, dot white polish in the area between the green polish and the dark teal polish. Dot the white closer to the dark teal so you get dark teal tips. It is VERY IMPORTANT to make sure these are tiny dots and they are in an irregular pattern. Vary the size of the dots and the placement a little. You are creating the sea spray.
Step 8: Seal with a top coat.
So easy you can even do it on your right hand. I promise!
Did you like this look? Would you like more nail art from me? Let me know in the comments! :)


This looks amazing! Will there be a video or frame by frame instructions?
ReplyDeleteI'm having camera issues right now, but if you'd like, I could try and do a video or frame by frame instructions.
Delete