Hi darlings!

This nail art design is inspired by the bottle of Marc Jacobs Dot perfume. I have been a little obsessed with the design of the bottle and I've been testing out the scent for a while now and I've fallen for it as well. Hopefully Sephora will have a sale for Beauty Insiders soon so I can pick up a bottle.
Polishes You Will Need...


3. Wait a few minutes for your nails to dry. If you used too much polish on the dots this is essential.
4. Paint on a layer of top coat. A thicker top coat like Seche Vite works well because it gives the glitter something to really adhere to.
5. Place the red hex glitter on your nail using the tweezers in a five-petal flower conformation. I made a crude image using Paint to give you an idea of what to go for. It may be good to practice placing glitter on a piece of paper if you're unsure of yourself. I did a practice flower so I could figure out the spacing and then use that as a model. I put five glitter flowers on my nail but you could use as many or as few as you want. I happen to think it looks better if you don't have them evenly spaced but it's still better if they're not touching so you can see each individual flower. If you don't work quickly, you may have to add more top coat to make the glitter adhere.


I'm really proud of how this turned out and hope you enjoy attempting this design. Let me know if you liked the design and the tutorial in the comments below. Is this something you'd like to see more of on this blog? Let me know.
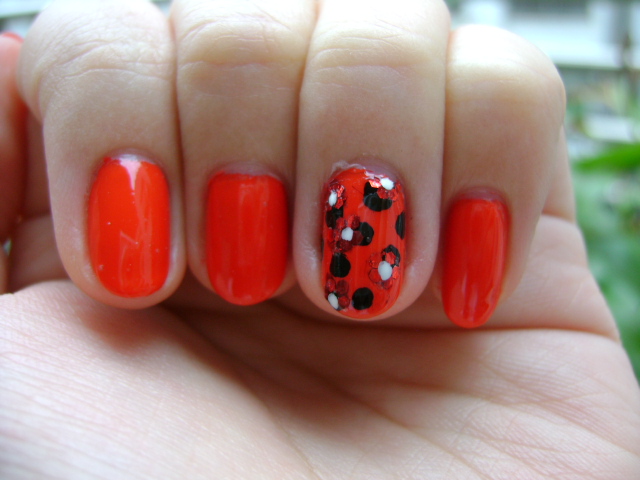
SWATCHES (Monsooner or Later photographed really orange but it's actually red.)


This nail art design is inspired by the bottle of Marc Jacobs Dot perfume. I have been a little obsessed with the design of the bottle and I've been testing out the scent for a while now and I've fallen for it as well. Hopefully Sephora will have a sale for Beauty Insiders soon so I can pick up a bottle.
I'm never sure what to do when it comes to nail art because it seems like everything's been done before. That, and I don't really have the patience for anything too labor intensive. This look took a little while because of the glitter placement but I am so happy with how it turned out. I only did it as an accent nail but I think it could look nice as a full manicure as well.
Polishes You Will Need...
- Red Nail Polish (I used O.P.I.'s Monsooner or Later)
- Black Nail Polish (I used Milani's Black Magic but I don't recommend it)
- Red Hexagonal Glitter (I don't have nail art supplies so I just used the glitter from Spoiled polish in "Ants in My Pants")
- White Nail Polish (I used Absolute! Nail Art Paint which is a striper)
- Top Coat (I used Seche Vite)
- Dotting Tool (I actually used a pen that has run out of ink but you could use a dotting tool, toothpick, or the head of a pin. Whatever works best for making polka-dots.)
- Tweezers (I used them to place the glitter)
1. Paint your nails, or the nail you're going to be doing the design on, with your red polish. You want a fully opaque base so use as many coats as you need. Again, I used O.P.I.'s Monsooner or Later (though I had some issues with the formula that will be covered in an upcoming review).
2. Using your dotting tool, paint large black dots over the nail. I used Milani's Black Magic but it was very thick and gloopy and formed threads of polish so I would not recommend using it. Do not let the dots touch. You can evenly space them but I decided to make them a little off center. Just be consistent. Looking at the perfume bottle may help you decide how large you want the dots to be and how you want to space them.
2. Using your dotting tool, paint large black dots over the nail. I used Milani's Black Magic but it was very thick and gloopy and formed threads of polish so I would not recommend using it. Do not let the dots touch. You can evenly space them but I decided to make them a little off center. Just be consistent. Looking at the perfume bottle may help you decide how large you want the dots to be and how you want to space them.


3. Wait a few minutes for your nails to dry. If you used too much polish on the dots this is essential.
4. Paint on a layer of top coat. A thicker top coat like Seche Vite works well because it gives the glitter something to really adhere to.
5. Place the red hex glitter on your nail using the tweezers in a five-petal flower conformation. I made a crude image using Paint to give you an idea of what to go for. It may be good to practice placing glitter on a piece of paper if you're unsure of yourself. I did a practice flower so I could figure out the spacing and then use that as a model. I put five glitter flowers on my nail but you could use as many or as few as you want. I happen to think it looks better if you don't have them evenly spaced but it's still better if they're not touching so you can see each individual flower. If you don't work quickly, you may have to add more top coat to make the glitter adhere.
6. Using a dotting tool or a white striper, add white dots in the center of each flower. Don't cover up the glitter but it's alright if the white overlaps a bit at the center.

7. Finish with another coat or two of top coat to seal in your design.
And you're done! :)
SWATCHES (Monsooner or Later photographed really orange but it's actually red.)


No comments:
Post a Comment